Wednesday, January 30, 2013

Crocheted Vintage Piece


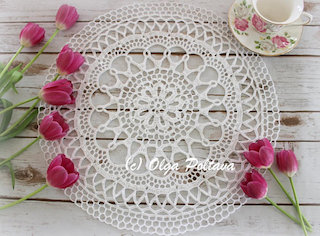
This gorgeous lacy piece was made by my husband’s great-grandmother!

Originally it was intended as a bedspread, but it never was completed. My mother-in-law passed it to me wondering if I could finish it.

I think I could’ve recreated the same motif, but I don’t think I can find the same or similar thread. You see, the thread used for this piece is thicker than size 10 crochet cotton thread, but it’s thinner than cotton yarn. I have never seen such thread at stores. 

So I turned this lovely piece into a small tablecloth. I debated for a while if I should make a trim and decided against it. I think it’s quite charming the way it is!

I’m very thankful to my mom-in-law for this wonderful present! I have two boys and perhaps one day I will pass this vintage piece to my daughter-in-law.

I'm linking to
Adorned From Above Blog Hop @ Adorned From Above
Show and Tell Friday @ My Romantic Home,
Link Your Stuff @ Annamarie's Haakblog

Wednesday, January 23, 2013

Crochet Thread Flower, Photo Tutorial


One of the readers asked me for help with Brunfelsia Inspired Crochet Flowers, and I promised her to make a photo tutorial.


Size 10 crochet cotton thread, size 10 hook.

We begin by making ch 5 and joining it with a sl st into a ring.


Next we work the first round. Ch 2, *sc in ring, ch 1* 4 times, join with a sl st.

After this round we should have 5 ch-1 spaces. We will use these ch spaces to make five petals.


In the second round we make our petals. Here is how a petal is made: (ch 3, 2 dc, ch 3, sl st) all in the same space.


Then we use a sl st to get into next ch-1 space, and again we make a petal: (ch 3, 2dc, ch 3, sl st) all in that ch-1 space.


In the same manner, we make all five petals, and a sl st to join with the first petal.


In the third round, we make the petals a bit bigger.

ch 4


Next we make a sc in top of the petal; that would be the space between 2 dc.


Again ch 4


And now we make a sl st into space between two petals.


The picture below shows how I worked two petals.


And in the same manner, we work all five petals.


That’s it! Fasten off!


~~~~~~~~~~~~~~~~~~~~~~~~~~~~~~

Crochet Patterns from my Shop

Tuesday, January 15, 2013

Lovely Shells Baby Blanket


Just finished another baby blanket! I have made my best effort to write the instructions for it. But, of course, there might be mistakes; so if something doesn’t make sense, please ask/let me know in the comments.


I used Pound of Love yarn by Lion Brand.

This pattern is my original design. It cannot be posted on other sites or distributed in any other form. If you would like to share this pattern, you can post ONE image on your site with the link to my original post. You can use this pattern to make items for personal use or for sale. If you sell finished items from this pattern, you must give design credit to Lacy Crochet blog (lacycrochet.blogspot.com). Please, respect my work. Thank you!


Finished Size: Approximately 38 by 27 inches


Materials:

Pound of Love by Lion Brand, Bubblegum (Bright cerise), 1 ball

Crochet hook US size E/4 (3.50 mm)

Shell in this pattern: (*dc, ch 1* 4 times, dc) all in same space.


Ch 121 loosely.


Row 1: (dc, ch 3, dc) all in 8th ch from hook, ch 1, *skip next 4 ch, (dc, ch 3, dc) all in next ch, ch 1* 22 times, skip next 2 ch, dc in last ch. Ch 3, turn.


Row 2: *shell in next ch-3 space* 23 times, skip next ch, dc in next ch. Ch 4, turn.


Row 3: * (dc, ch 3, dc) all in 3rd dc of next shell, ch 1* 23 times, dc in 3rd ch of turning ch-3. Ch 3, turn.


Repeat Rows 2-3 until you have 71 rows in total. In the last row do not make turning ch 3.


Edging:


Ch 1, turn. * (sl st, ch 3, 3 dc) all in next ch-3 space, skip ch-1 space * across. At the end of this row, make (sl st, ch 3, 3 dc) in the corner space.


Continue working in end of rows: * (sl st, ch 3, 3 dc) all in next space, skip next dc-space* across. Make (sl st, ch 3, 3 dc) in the corner space.


Continue working over beginning chain: * (sl st, ch 3, 3 dc) all in next ch-4 space* across. Make (sl st, ch 3, 3 dc) in the corner space.


Working in end of rows: skip next ch-3 space, * (sl st, ch 3, 3 dc) all in next space, skip next ch-3 space* across. Sl st to join. Fasten off.


More blanket patterns from my shop:


Thursday, January 10, 2013

Swirl Flowers


Ch 55 (or 70 for a bigger flower) loosely.

4 dc in 3rd ch from hook, *skip next ch, 5 dc in next ch* across.

Note: after you have made 5 dc in one ch, the next ch will become hardly visible (that’s the one that must be skipped). Make sure you don’t skip 2 ch instead of 1.

Finish off but leave a yarn tail long enough to stitch the flower together. Wave in the short yarn tail. Roll the flower and stitch together using a tapestry needle.

If you need more help on how to roll the flower, see this tutorial. 

I'm linking to
Home Sweet Home Friday @The Charm of Home,
Show and Tell Friday @ My Romantic Home,
 

Feathered Nest Friday @ French Country Cottage
Be Inspired Friday @ Common Ground
Link Your Stuff @ Annamarie's Haakblog  


Sunday, January 6, 2013

Thinking of Spring Doily

The holidays are behind us, but spring is still some time away. I feel like I’m ready for it though. I love it when crocuses and tulips push through the soil and start blooming.


This doily’s design reminds me of crocuses. I like how many different stitches are used in its design creating an elaborate, spring look.

The few flowers in the pictures are from my yard. The pink hydrangeas are so pale from the lack of sunshine. But white primroses are doing well in such weather.


The pattern (symbol chart) was from Coats Crafts UK (click below)

The pattern is available here: Symbol Chart  

What are you crocheting and thinking of these days?


I'm linking to  Clever Chicks Blog Hop @ The Chicken Chick
Make It Pretty Monday @ The Dedicated House 
Adorned From Above Blog Hop @ Adorned From Above

Tuesday, January 1, 2013

Lacy Braids Baby Blanket


So many people keep asking me to write the pattern for the lacy baby blanket that I shared on my blog last year. However, I am not a professional crochet pattern writer and it’s going to be a difficult task for me. It’s one thing to crochet elaborate items yourself and totally different to explain it in writing to others.

So before I start working on writing that pattern, I thought I ought to practice with simpler ones. Here is a baby blanket that I designed and wrote the pattern for.  I named this blanket Lacy Braids.


The pattern is somewhat easy. Once you crocheted three rows, you will repeat the third row over and over. For the trim I used crab stitch (also known as reverse single crochet). I prefer this stitch for blanket trimming because it helps prevent the item from stretching and losing its shape.    


Here’s a picture of the main stitch. It looks identical on both sides.


This pattern is my original design. It cannot be posted on other sites or distributed in any other form. If you would like to share this pattern, you can post ONE image on your site with the link to my original post. You can use this pattern to make items for personal use or for sale. If you sell finished items from this pattern, you must give design credit to Lacy Crochet blog (lacycrochet.blogspot.com). Please, respect my work. Thank you!


Finished Size: Approximately 33” (84 cm) square

Materials:
Pound of Love by Lion Brand, Antique White, 1 ball
Crochet hook US size E/4 (3.50 mm)

Gauge: In pattern, 4 repeats = 5”
10 rows = 5”

Ch 145 loosely.

Row 1: Sk 4 ch, * dc2tog in next 2 ch, (dc, ch 3, dc) all in next ch, sk 2 ch * 28 times, dc in last ch. Ch 3, turn.

Row 2: (dc3tog, ch 3, sc) all in next 3-ch space, * ch 2, (dc3tog, ch 3, sc) all in next 3-ch sp * 27 times, dc in 3rd ch of turning ch-3. Ch 3, turn.


Row 3: (dc3tog, ch 3, sc) all in next 3-ch sp, * ch 2, sk next ch-2 sp, (dc3tog, ch 3, sc) all in next 3-ch sp * 27 times, dc in 3rd ch of turning ch-3. Ch 3, turn.

Repeat Row 3 sixty-five times. At the end of the last row, do not make turning ch 3.

For the trim, use crab stitch. Go backwards working over the last row, make one stitch into each ch-2 sp and each ch-3 sp. Make two stitches in corner.

Continue  working in end of rows, make one stitch into each ch-3 sp. Make two stitches in corner. 

Continue  working over beginning chain, make stitches skipping 2 dc at a time. Make two stitches in corner. 

Continue working in end of rows, make one stitch into each ch-3 sp. Make two stitches in corner. Sl st to first st to join. Fasten off.

~~~~~~~~~~~~~~~~~~~~~~~~~~~~~~~~~~~~~

February, 2013 Update:


One thing I didn’t point out about this pattern is that the clusters in the first row don’t look the same as in the following rows. Somehow I just couldn’t figure out a good way to start and make all the rows look the same. Perhaps in the future as my crocheting skills improve I’ll be able to fix it. But for now I’m leaving this pattern as it is.


~~~~~~~~~~~~~~~~~~~~~~~~~~~~~~~~~~~~~~~

March, 2015 Update:

One of the readers of my blog came up with the way to start this blanket so that the first row matches the rest. I haven't tried her suggestion, but I read through it and it makes sense. I post it below. Thank you Jeniffer!!!

Row 1: Sk 4 ch, dc3tog in next 3 ch, ch 3, sc in last ch of the dc3tog * ch 2, sk 2 ch, dc3tog in next 3 ch, ch 3, sc in last ch of the dc3tog * 28 times, sk 2 ch, dc in last ch. Ch 3, turn.


More blanket patterns from my shop: