Monday, September 30, 2013

Llama and Silk Crochet Cowl Free Pattern


When the cooler days arrive, I will be well prepared! In addition to my lovely Lacy Infinity Scarf, I now have this cute crochet cowl as well.

This was not a new stitch, but a good old buddy. I used it to make Summer Baby Blanket as this simple stitch works wonderfully with variegated yarns.  


I’m not happy with my button, and I will definitely replace it as soon as I can find a better one. I think a black or dark green button will look so much better.

But I do like the idea of a button on my cowl. Since this is a lacy stitch, I can pass the loop through the open spaces and style my cowl in different ways.


And here is my free pattern:

Skill Level: Easy

Finished size: 26 inches by 11 inches

Materials: Royal Llama Silk Splash by Plymouth Yarn (60% fine llama, 40% silk), 2 skeins (one skein weights 50 grams and measures 102 yards)

Crochet Hook US size G/6 (4.25mm)

Big button 

Ch 45.

Row 1: (4 dc, ch 3, 1 dc) all in 5th ch from hook, *sk 5 ch, (4 dc, ch 3, 1 dc) all in next ch* across, dc in last ch. Ch 3, turn.

Row 2: (4 dc, ch 3, 1 dc) all in next ch-3 space across, dc in 3rd ch of turning ch-3. Ch 3, turn.

Repeat Row 2 until your crochet piece measures 26 inches in lengths.

To make a button loop, make ch 13 (more or fewer depending on the size of your button), sl st to 1st ch. Fasten off. Attach the button on the other end of the cowl (use the picture below as a guide).  


More patterns for women from my shop:


Thursday, September 26, 2013

Crochet Baby Hat Size 6 – 12 months, Advanced Level Free Pattern


Whenever 
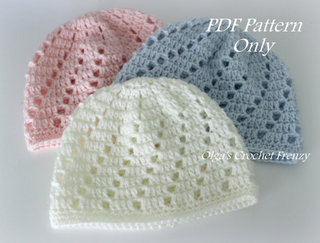
I make a new baby blanket, I also try to come up with a matching baby hat pattern. A handmade baby blanket makes a nice gift, but a baby blanket and a hat make even nicer gift set.
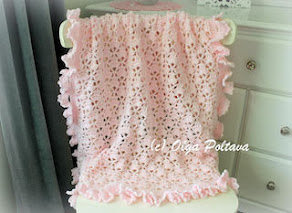


So 
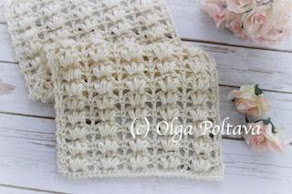
here is a free crochet pattern for a baby hat made in same stitch as the Green Baby Blanket. As I was making it, I aimed for a smaller size (either newborn or 3-6 months), but my baby hat came out quite bigger than intended. It measures about 17 inches in diameter and 7 inches in height, which would be a  6-12 months size.

Since until now I didn’t have any baby hat patterns in this size, I decided not to remake/rewrite the pattern. Besides, this is not an easy pattern and it took me a lot of work and figuring out.

So I stress it out again, it's a difficult pattern; in fact, it's the most difficult one of all the hats I made and wrote patterns for. If you are a beginner crocheter, this is not the best project to start. Check out other free baby hat patterns on Lacy Crochet.


This pattern is my original design. It cannot be posted on other sites or distributed in any other form. If you would like to share this pattern, you can post ONE image on your site with the link to my original post. You can use this pattern to make items for personal use or for sale. If you sell finished items from this pattern, you must give design credit to Lacy Crochet blog (lacycrochet.blogspot.com). Please, respect my work. Thank you!


Skill Level: Advanced


Snuggly Wuggly by Loops and Threads


US hook G/6


Gauge: 3 first rounds measure 3.75 inches


V-stitch: (dc, ch 1, dc) worked all in the same space or stitch.


In this pattern, V-stitches are worked either


into V-stitches of the previous round (that is, into ch-1 space between 2 dc) or


into space between two V-stitches of the previous round (that is, into space prior to next V-stitch).


Ch 5, join with sl st into ring.


Round 1: Ch 4, *dc in ring, ch 1* 11 times. Join with sl st into 3rd ch of beginning ch-4.


Round 2: Sl st into next ch-1 space, ch 4, dc in same ch-1 space, V-st in each ch-1 space around. Join with sl st into 3rd ch of beginning ch-4.


Round 3:  Sl st into next ch-1 space, ch 4, dc in same ch-1 space, V-st into next space between two V-st of previous round, *V-st into next 2 V-st, V-st into next space between two V-st of previous round* 5 times, V-st into next V-st. Join with sl st into 3rd ch of beginning ch-4.


Round 4: Sl st into next ch-1 space, ch 4, dc in same ch-1 space, V-st into each V-st around. Join with sl st into 3rd ch of beginning ch-4.


Round 5: sl st into next ch-1 space, *ch 1, (2-dc cluster, ch 1, 2-dc cluster, ch 1, 2-dc cluster) all in next V-st, ch 1, sc in next V-st* around. In the last pattern repeat, make last sc in space where sl st in the beginning of the round was made.


Round 6: ch 2, dc in next ch-1 space, *ch 1, sc in next ch-1 space, ch 3, sc in next ch-1 space, ch 1, 2dctog over next two ch-1 spaces* around. In the last pattern repeat, don’t make 2dctog, but make sl st into space between beginning ch-2 and dc.


Round 7: (ch 2, dc, ch 1, 2-dc cluster, ch 1, 2-dc cluster) all in same space where sl st was made, *ch 1, sc in next ch-3 space, ch 1, (2-dc cluster, ch 1, 2-dc cluster, ch 1, 2-dc cluster) all in next 2dctog* around; ch 1, sc in next ch-3 space, ch 1, sl st to 2nd ch of beginning ch-2.


Round 8: sl st to next ch-1 space, *ch 3, sc in next ch-1 space, ch 1, 2dctog over next two ch-1 spaces, ch 1, sc in next ch-1 space* around. In the last pattern repeat, don’t make last sc, but make sl st into space where sl st in the beginning of the round was made.


Round 9: sl st to next ch-3 space, *ch 1, (2-dc cluster, ch 1, 2-dc cluster, ch 1, 2-dc cluster) all in next 2dctog, ch 1, sc in next ch-3 space* around. In the last pattern repeat, don’t make last sc, but make sl st into space where sl st in the beginning of the round was made.


Round 10: sl st to next ch-1 space, *ch 1, sc in next ch-1 space, ch 3, sc in next ch-1 space, ch 1, 2dctog over next two ch-1 spaces* around. In the last pattern repeat, make last 2dctog over last ch-1 space and ch-1 space where sl st in the beginning of the round was made.


Round 11: sl st to next ch-1 space and to next ch-3 space, *ch 1, (2-dc cluster, ch 1, 2-dc cluster, ch 1, 2-dc cluster) all in next 2dctog, ch 1, sc in next ch-3 space* around. In the last pattern repeat, make last sc in space where sl st in the beginning of the round was made.


Round 12 same as Round 6.


Round 13 same as Round 7.


Round 14 same as Round 8.


Round 15 same as Round 9.


Round 16 same as Round 10.


Round 17 same as Round 11.


Round 18 same as Round 6.


Round 19 same as Round 7. Fasten off.


More baby patterns from my shop:


Tuesday, September 24, 2013

Crochet Rose Tutorial


I’ve seen such roses (but in smaller sizes) used in Irish crochet. The idea is not complicated, and I was able to come up with my own pattern. For the roses shown, I used cotton yarn (can’t tell the size and brand as it’s been in my stash forever).


I can picture a beautiful cushion with such rose bouquet on it. Another idea would be a table runner; something similar to this one. Or, perhaps, these roses could be incorporated into a gorgeous afghan (that would be a lot of work though).  


As you can see from the pattern, I used different amount of double crochets (15, 16, 17, and 18) for the petals. That’s because I wanted the petals to be of different sizes. Also the place where the petals are attached with a slip stitch can be slightly different.

You may end up with a bit of chain left, which is not enough to make a petal. In that case, just wave it in on the wrong side of the rose.


Ch 100.


Center: Sl st in 8th ch from hook. Ch 1, 17 dc in ring, hdc in ring.


In the following instructions dc and hdc should be worked around the chain.


Petal 1: hdc, 15 dc, hdc around ch. Sl st in 7th dc of ring.


Petal 2: ch 1, hdc, 17 dc, hdc. Sl st in 7th dc from last sl st.


Petal 3: ch 1, hdc, 18 dc, hdc. Sl st in 6th dc of Petal 1.


Petal 4: ch 1, hdc, 18 dc, hdc. Sl st in 2nd dc of Petal 2.


Petal 5: ch 1, hdc, 15 dc, hdc. Sl st in 10th dc from last sl st.


Petal 6: ch 1, hdc, 16 dc, hdc. Sl st in 6th dc of Petal 3.


Petal 7: ch 1, hdc, 15 dc, hdc. Sl st in 11th dc from last sl st.


Petal 8: ch 1, hdc, 17 dc, hdc. Sl st in 11th dc of Petal 4.


Petal 9: ch 1, hdc, 15 dc, hdc (If you used up all the chain, make this last hdc into last ch, but if you have a bit of chain left make this hdc around ch). Sl st in 4th dc of Petal 5.

Fasten off. If you have a small amount of chain left, wave it in on the wrong side of the rose.


If you need crochet leaves to go with your roses, you might want to check out these patterns:


Irish crochet  leaf pattern


Crochet Patterns from my Shop

Monday, September 23, 2013

Green Baby Blanket, How to Make 2-dc Clusters


In the comments to my Green Baby Blanket pattern, Kelly wrote:


Row 1: please explain how the 2dc-cluster works? How do I keep it all in the same stitch? :-)


I took a close-up picture of clusters in Row 1. The photo shows the following instructions:


(2-dc cluster, ch 1, 2-dc cluster, ch 1, 2-dc cluster) all in next ch


Remember that a 2-dc cluster is two unfinished dc worked into same space (or same stitch), then finished together.

Here are the step-by-step instructions for it:

1. Yarn over, insert hook in stitch, draw yarn through the stitch, yarn over, draw through 2 loops on the hook. You now have 2 loops on the hook left.

2.  Yarn over, insert hook in same stitch, draw yarn through the stitch, yarn over, draw through 2 loops on hook. You now have 3 loops on the hook. 

3. Yarn over, pull loop through all 3 loops on hook. Your 2-dc cluster is made!


Sunday, September 15, 2013

Quick and Easy Crochet Scarf, my free pattern


This scarf was super quick and easy to make because the pattern involves only chains and trebles. I made the scarf in one evening while watching a movie. I think this might be a good project for beginner crocheters.

I used leftover acrylic yarn from my stash, so I can’t say precisely how much yarn is need. It was a 3-ply yarn, and I worked with a hook US size F/5 (3.75 mm). I didn’t add fringe to my scarf, but you can always try that if you wish.


Ch 37 loosely.

Row 1: tr in 6th ch from hook, tr in next ch, *ch 3, skip 3 ch, tr in next 3 ch* across. Ch 4, turn.

Row 2: tr in next 2 tr, *ch 3, tr in next 3 tr* across. Ch 4, turn.

Repeat Row 2 until your scarf has desired length. Don’t make turning ch 4 in last row. Fasten off.


More scarf and cowl patterns from my shop:


Thursday, September 12, 2013

My New Skirt


Too bad summer will be over soon because I just made myself a gorgeous summer skirt! Of all the things I’ve crocheted in the past couple of years, I think this one is the most awesome. Yes, I know it’s kind of immodest to praise oneself so, but I really really love how it turned out.


I still hope to wear it at least a couple more times before fall arrives.  

The thread used for this skirt was Bernat Handicrafter, 100% acrylic. It’s about as thin as cotton crochet thread size 10, but it’s much softer, which makes it more suitable for making women garments.

I used three balls that I bought from Wal-Mart for $2.47 each, plus tax. I think it’s a fantastic deal. A skirt under $10, I can’t be more pleased.

This is a good example how crochet can save money!  


Unfortunately, I don’t have a pattern to share with you. I would love to try writing it, but I have no idea how to approach such task. The skirt has over 50 rounds, and writing out each one of them would be insane. Perhaps there is some other way, so any advice, tips, or ideas will be greatly appreciated!

The groundwork for my skirt was a pineapple stitch. I love crochet “pineapples” because with a bit of creativity and some easy math, they can be worked into any design.

I made lots of increases, adding more and more “pineapples”, and as a result I got a full skirt. It’s important that the skirt is so wide. As we all know crochet things stretch a great deal, and a tighter/straight skirt can lose its shape quickly.


I’ve always had a dream to make a crochet dress, which actually seemed impossible.  I now feel like I’m one step closer to it.  

Update: I got a request for a picture of the skirt with the waistline shown. So here it is.

I made a cord (using chains) and using a safety pin I passed it though the openings in the waist. I tie the cord to secure the skirt on my waist. The cord is not shown in the picture. 


I'm linking this post to 
Tutorials, Tips and Tidbits @ Stone Gable
Create It Thursday @ Lamberts Lately
Link Your Stuff @ Annamarie's Haakblog
Thrifty Things Friday @ The Thrifty Groove
Craft Schooling Sunday @ Crative Jewish Mom
Home Sweet Home Friday @The Charm of Home,
Show and Tell Friday @ My Romantic Home,


Monday, September 9, 2013

Crochet Bath Mat, Very Simple Pattern


I recently discovered Sugar’n Cream cotton yarn by Lily. I think it’s quite popular among crocheters, but somehow I only now made a complete crochet project using this yarn.

I have had an idea to make a bath mat for quite a while. Hundred percent cotton yarn would be the best choice for such item, so that’s why I turned to Sugar’n Cream.


My bath mat is simple, though I had a lace trim in mind for it. Eventually I rejected the notion because this is an item that will be washed regularly and, therefore, a sturdier and tighter trim would be more practical.


The alternating rows of double crochets made into back loops only and front loops only gave me a beautiful ribbed texture. 


Measurements: 27 by 17 inches

Big ball of Sugar’n Cream by Lily (710 yards) Note, I didn’t use the entire ball of yarn, I have about 1/3 of it left.

US size hook H/8 (5 mm)

Ch 79.

Row 1: dc in 4th ch from hook, dc in each ch across. Ch 3, turn.

Row 2: dc in front loop only in each dc across. Ch 3, turn.

Row 3: dc in back loop only in each dc across. Ch 3, turn.

Repeat Row 2 – Row 3 until you have 24 rows in total.

Trim: Make one round of sc evenly spaced around the mat. Then make one round of crab stitches (reverse sc).

Fasten off.    

I'm linking this post to Tweak It Tuesday @ Cozy Little House,
Clever Chicks Blog Hop at The Chicken Chick

Thursday, September 5, 2013

Getting Started on Spider Stitch Shawl


Tracy from CrochetHappy hosts a CAL for my Spider Stitch Shawl. I feel honored that my pattern was chosen. However, I've been getting messages from crocheters letting me know that they have trouble understanding the pattern. 

So I made this tutorial for the spider stitch triangle. I hope it can help. 


Row 1: Ch 4, 2 dc in fourth ch from hook. Ch 3, turn. 

Note: I'm not showing turning chains in the pictures.


Row 2: 2 dc into first st of row, ch 4, 3 dc into last dc. Ch 3, turn.

3 dc into last dc means the last dc of the row. In reality, it's not a dc at all, it's a turning chain, but here and throughout we will refer to it as last dc.  


Row 3: 2 dc into first st of row, ch 6, 3 dc into last dc. Ch 3, turn.


Row 4: 2 dc into first st of row, ch 8, 3 dc into last dc. Ch 3, turn.


Row 5: 2 dc into first st of row, ch 4, skip 1 dc, 3 dc in next dc, ch 2, sc in ch-4 space grabbing all three chains of previous rows, ch 2, 3 dc in next dc, ch 4, 3 dc into last dc. Ch 3, turn.

The picture below shows:  2 dc into first st of row, ch 4, skip 1 dc, 3 dc in next dc, ch 2, sc in ch-4 space grabbing all three chains of previous rows,


Note carefully that sc in made into ch-4 space of Row 2, grabbing the chains from Row 3 and Row 4


This picture shows the rest of the row:  ch 2, 3 dc in next dc, ch 4, 3 dc into last dc. Ch 3, turn.


Row 6: 2 dc into first st of row, ch 6, skip next 4 dc, 3 dc in next dc, ch 1, 3 dc into next dc, ch 6, 3 dc into last dc. Ch 3, turn.

The picture below shows the following instructions:  2 dc into first st of row, ch 6, skip next 4 dc, 3 dc in next dc,


Note that when it says skip next 4 dc, in reality we are skipping: 2 dc, ch 4, 2 dc


This picture shows the rest of the row:  ch 1, 3 dc into next dc, ch 6, 3 dc into last dc. Ch 3, turn.

Here we also skip 2 dc, ch 4, 2 dc and make 3 dc into the last dc of the row.


Row 7: 2 dc into first st of row, ch 8, 3 dc into ch-1 space, ch 8, 3 dc into last dc. Ch 3, turn.

Finally a somewhat easy row. Just look at the pictures. 


Row 8: 2 dc into first st of row, *ch 4, skip 1 dc, 3 dc into next dc, ch 2, sc into ch-4 space grabbing all three chains or previous rows, ch 2, 3 dc in next dc* 2 times, ch 4, 3 dc into last dc. Ch 3, turn.

The picture below shows the instructions between * * executed one time


And this picture shows the same instructions executed one more time as well as the instructions after the second *. 


Row 9: 2 dc into first st of row, *ch 6, skip next 4 dc, 3 dc in next dc, ch 1, 3 dc into next dc* 2 times, ch 6, 3 dc into last dc. Ch 3, turn.


Row 10: 2 dc into first st of row, *ch 8, 3 dc into ch-1 space* 2 times, ch 8, 3 dc into last dc. Ch 3, turn. 


After Row 10, you only need to repeat Row 8 - Row 10, but the amount of times you execute the instructions between * * will increase and so will your shawl triangle.